Dashes and Wedges
In this tutorial, I want to talk about dash and wedge notation and the most common issues students experience when dealing with molecular rotations and creating mirror images of various molecules. If you have a molecular model kit, you might want to grab it because you’ll likely need it to help visualize the molecules we’re about to discuss. If you want to follow along with me, you’ll need a molecular model kit with a carbon and some differently colored atoms to signify various groups.
Drawing Molecules Using Dashes and Wedges
When we draw a molecule in 3D, we imagine that a couple of bonds are in the plane of the paper. For example, in my case here, the orange, black, and white balls are all in the plane of the paper. The purple ball is looking towards us, so we show this atom on a wedge, while the green one, which is behind, is shown on a dash as it is looking away from us.
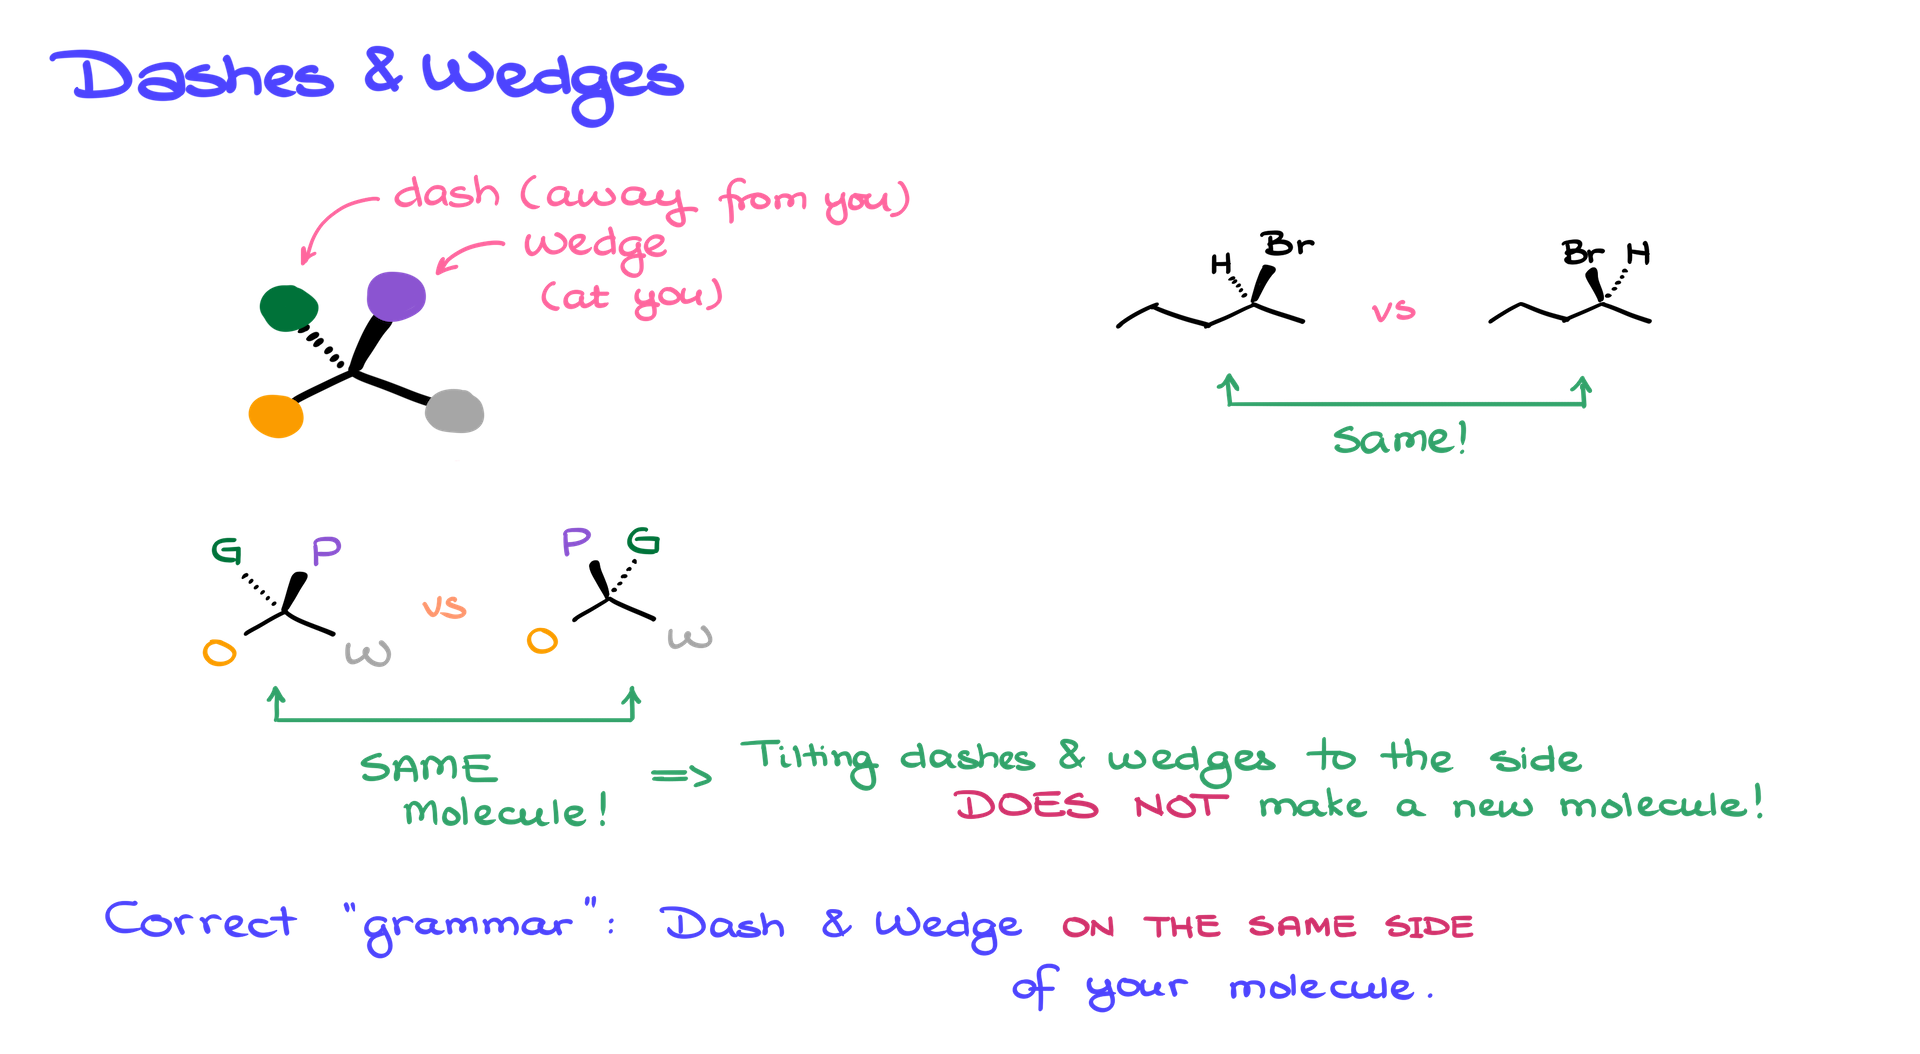
Here’s an important point to note: when working with this molecule, if I align it so the purple atom is looking towards the camera and the green atom is looking away, we can’t actually see the green one. On paper, we need to tilt the molecule a bit to one side or the other. We can either show the wedge on the right side and the dash on the left side or flip it, with the wedge on the left and the dash on the right. These two versions represent exactly the same molecule. I’m simply tilting it slightly in space.
Another critical thing to remember when drawing dashes and wedges is that both the wedged atom and the dashed atom should always be on the same side of the molecule. You should never draw a wedge on one side and a dash on the other side of the molecule—this wouldn’t make sense stereochemically. So, when drawing two molecules where bromine is looking at you and hydrogen is looking away (on a dash), it doesn’t matter which version you draw. These are the same molecule.
How Dashes and Wedges Change During Molecular Rotations
When rotating molecules in space, it depends on how we perform the rotation. For example, if I rotate the molecule along a vertical line, the atom that was on the wedge will now be on the dash, and vice versa. The same happens if we rotate along a horizontal plane. However, if we rotate the molecule in the plane of the paper, the dashes and wedges stay the same. So, if I take the molecule and rotate it in different ways, I’ll see similar results. For instance, in a vertical rotation, the bromine that was facing me will now be facing away, and the hydrogen that was facing away will now face me.
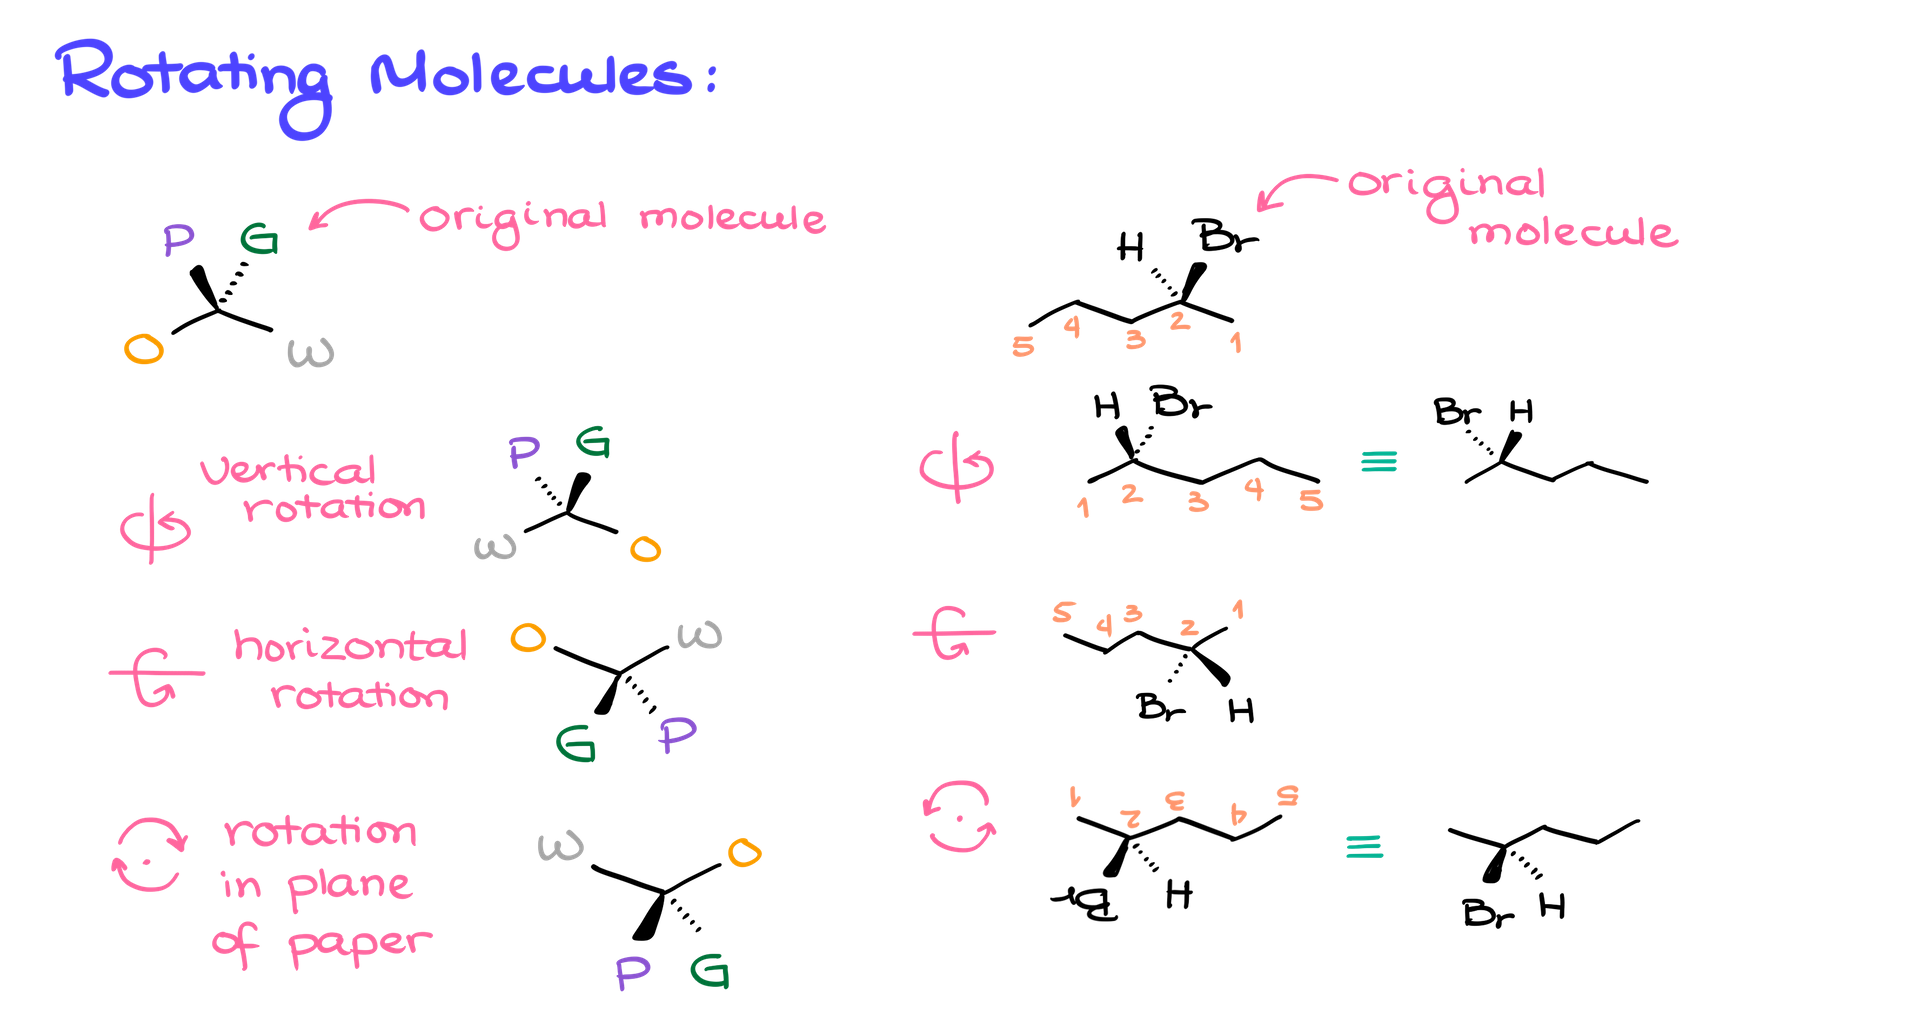
If we perform a horizontal rotation, we get the same molecule with the same relationship between the atoms, just tilted differently. Finally, if I rotate the molecule in the plane of the paper, the wedge and dash relationships stay the same, and there’s no real change in the orientation of the atoms relative to the viewer.
Making Mirror Images
Now, let’s discuss where many students get confused—making mirror images and then rotating those molecules. Let’s start with a familiar example and create a few mirror images. The simplest one you’ll encounter in your course is the mirror image formed by reflecting the molecule along a vertical line, just like an ink blot on a piece of paper.
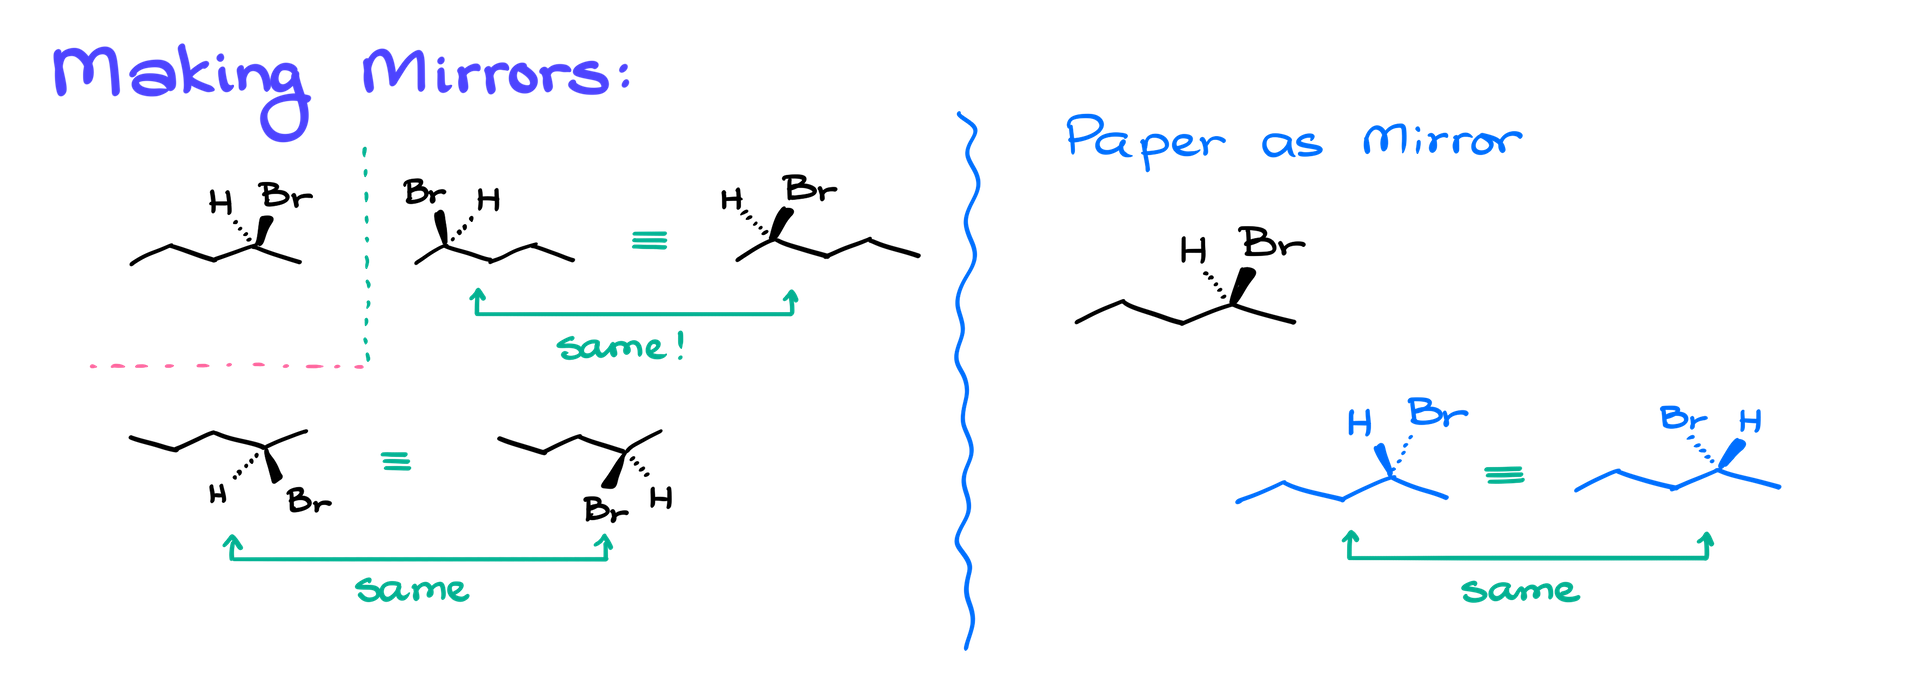
To make this mirror image, we trace the molecule backward. We then show the bromine atom looking at us and the hydrogen looking away. It’s important to note that you can tilt the bromine and hydrogen slightly in space. While the structure may not look exactly like an ink blot, it’s still a mirror image. You can test this with your model kit by tilting the molecules in different directions to see the same result.
Another way to make a mirror image is by using the horizontal line as the mirror plane. In this case, I start by reflecting the molecule’s stem, then showing the bromine atom looking at me and the hydrogen looking away. Again, I can tilt the wedge and dash slightly, and these two representations still represent the same molecule.
A common way to create a mirror image is by using the paper itself as the mirror. To do this, flip the dashes and wedges—now the bromine atom is looking away, and the hydrogen is looking at me. This is still a valid mirror image, and again, how the atoms are tilted in space is irrelevant as long as their positions on the dash or wedge remain consistent.
The key takeaway is that it doesn’t matter how the dashes and wedges are tilted. What’s important is which atom is on the wedge and which is on the dash. Whether an atom is slightly tilted to the left or right is irrelevant. What matters is that the hydrogen stays on the wedge and the bromine stays on the dash, regardless of their orientation.
So, when working with rotations and mirror images, remember to pay attention to which atoms are on the dashes and wedges. Misinterpreting or misrepresenting the molecule will likely cause you to lose points. The most important thing is to practice. To build confidence with these concepts, grab a few molecules from your textbook, draw their mirror images, and rotate them in space. And don’t forget, your molecular model kit can help you visualize these rotations.